
DE2_115(DAY2)用niosii和switch還有NiosII console去控制板子上的led
承接DAY1做的事情(https://ithelp.ithome.com.tw/articles/10283378),這次我想將板子上的switch作為輸入
去控制板子上的led,還有使用niosII console 去輸入值來操控led顯示。
實驗構想:
實驗一(板子上的switch作為輸入來控制led)
step1:用qsys拉好niosii和板子上pl的連結
step2:在eclipse中將switch的address的值assgin給led的address的值
step3:燒上板子以後開關switch就會讓在其上的led也跟著開關
實驗二(使用niosII console輸入值來控制led的明暗)
step1:sopcinfo同實驗一,只有.c檔的code要改
step2:燒上板子以後再在console中輸入值led的燈就會隨著改變了
實作(實驗一):
第一步:
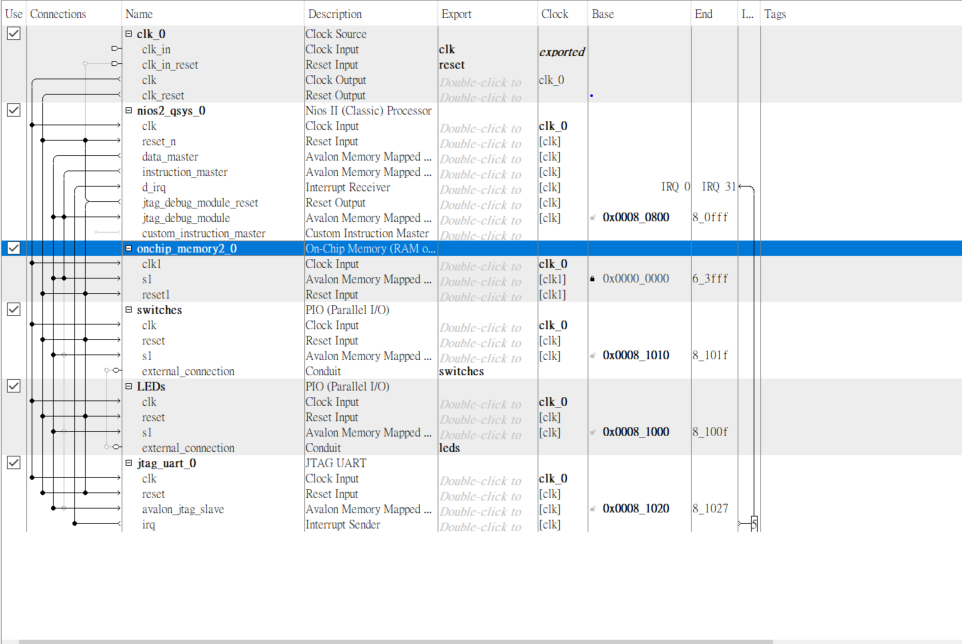
qsys的拉法跟day1很像,但是多了一個pio是要設為input,是用來給switch當作輸入
https://ithelp.ithome.com.tw/upload/images/20220203/20145199GrGrtrPNsp.png
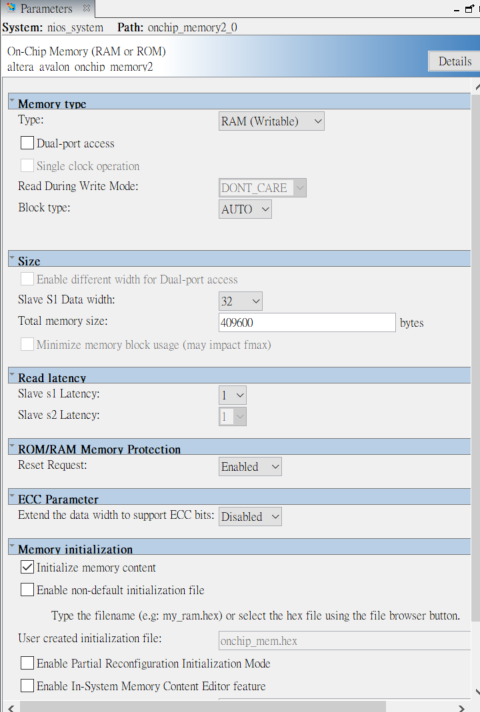
這邊提醒一下,onchip memory不能用預設的4096bytes,在quartus這邊生成sopcinfo檔案時不會有問題
但是到eclipse那邊build project時會提示(什麼overflow的),這邊的原因我還沒有搞清楚,但是我猜就是memory給太小了,所以我回到qsys那邊把onchip_memory size調成409600bytes就可以過了,之後搞懂再回來補解釋
https://ithelp.ithome.com.tw/upload/images/20220203/20145199WN6DPtU9zN.png
第二步:
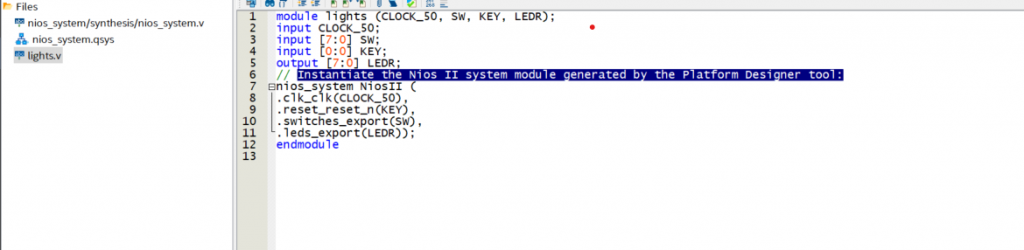
1.在qurtus中要呼叫出剛拉好的qsys檔案和.v檔,並新增一個.v檔叫做lights.v,其內容如下圖,只是把要用的port宣告進來,還有Instantiate the Nios II system module generated by the Platform Designer tool
https://ithelp.ithome.com.tw/upload/images/20220203/20145199OtYKS22oHG.png
2.這樣即可以去做analysis&synthesis
第三步:
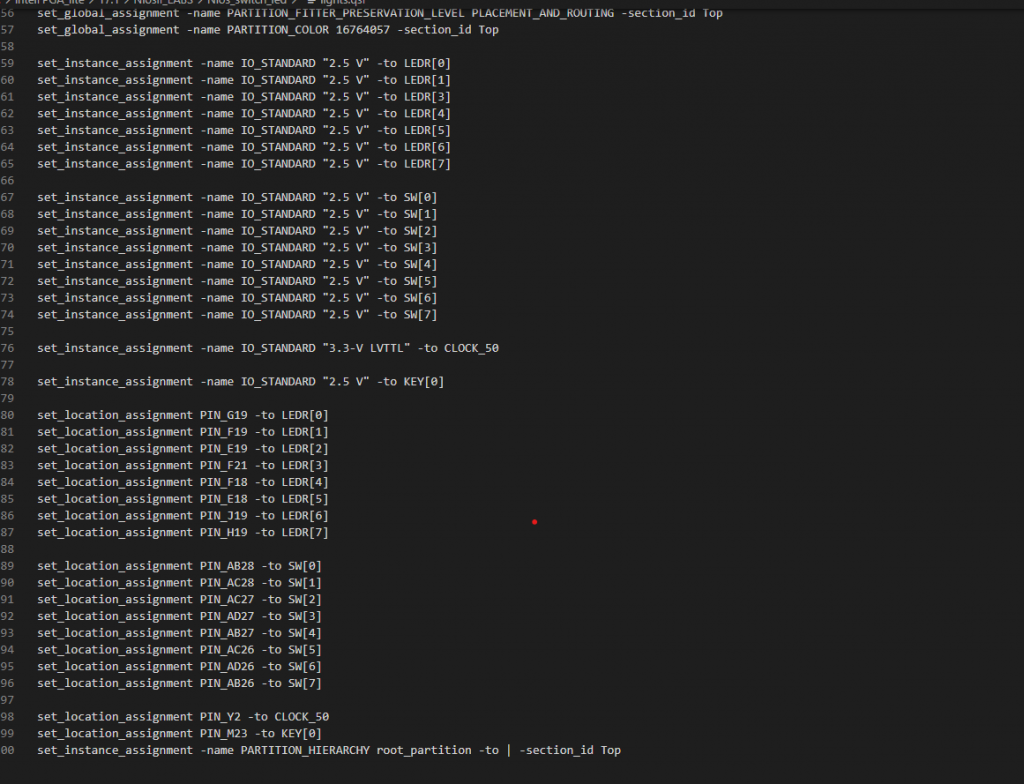
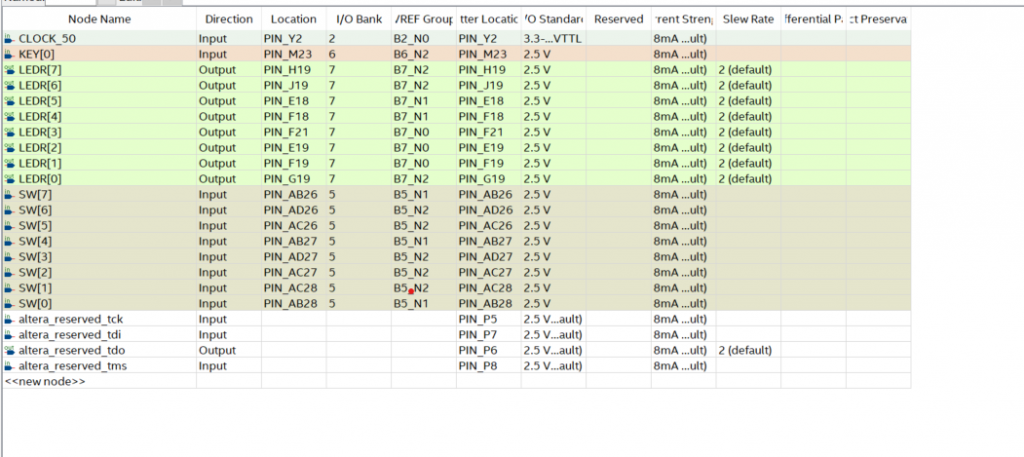
1.要做pin assignment,這次我就是直接在qsf那邊輸入我要用的腳位,儲存以後就會直接在pin planner那邊進行更動了,圖中的altera_reserved 那四個pin角是給jtag使用的,不需要自己再去assign腳位
https://ithelp.ithome.com.tw/upload/images/20220203/201451992rlXEEOKN1.png
https://ithelp.ithome.com.tw/upload/images/20220203/2014519988fEX2wQPj.png
2.做完了以後就可以compile design,如果過了的話就可以在上方工具欄中開啟tools=>
nios software buils tools for eclipse了
第四步:
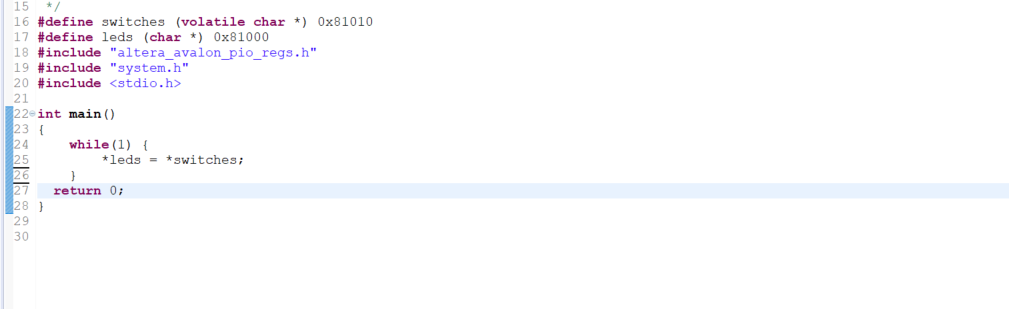
1.開啟之後會是空的,在右上角選擇file=>new=>niosii application and bsp from template選擇在quartus中生成的sopc(system-on-a-programmable-chip)info file,然後在system.h檔案中找到LEDS_BASE的address是0x81000,SWITCHES_BASE的address是0x81010,然後改.c檔的內容如下圖燒錄以後就可以看到led會隨著switch的開關而明暗
https://ithelp.ithome.com.tw/upload/images/20220203/20145199tJkS6PxOGP.png
實作(實驗二):
第一步:將.c檔裡面的code改成下圖
https://ithelp.ithome.com.tw/upload/images/20220203/20145199x9858o1Mik.png
第二步:在niosII console中輸入0-127的值led就會隨著輸入的值進行變化
https://ithelp.ithome.com.tw/upload/images/20220203/20145199Z3N0a13kdb.png
實驗影片連結:
實驗一:https://youtu.be/CECFKGfduHE
實驗二:https://youtube.com/watch?v=x4F6k7sC8Mc&feature=share
參考資料:
https://ftp.intel.com/Public/Pub/fpgaup/pub/Teaching_Materials/current/Tutorials/Introduction_to_the_Qsys_Tool.pdf
https://www.cnblogs.com/oomusou/archive/2008/10/02/nios2_console_ledg.html
用niosii和switch還有NiosII console去控制板子上的led_JavaScript 正規表達式 Regex_@hoyi-23_https://static.coderbridge.com/images/covers/default-post-cover-1.jpg)

用niosii和switch還有NiosII console去控制板子上的led_The introduction and difference between class component and function component in React_@LPGUEI_https://static.coderbridge.com/images/covers/default-post-cover-2.jpg)

用niosii和switch還有NiosII console去控制板子上的led_Functional Programming 筆記_@Jing-Teng_https://static.coderbridge.com/images/covers/default-post-cover-3.jpg)
